Access and Use Your Nimbus Instance
You have now created a Nimbus instance. The last steps involve logging in to the instance via SSH log in, which is described below, and attaching a storage volume for storing data and running your analyses from. Later, you may also want to transfer data from your local computer, if required.
Login via Terminal
On Linux and macOS, you can log in to Nimbus by opening a shell on your computer's default terminal.
What you need
- The private key pair file that was created in the Nimbus dashboard for your instance.
- It is best practice to save the private key pair file to the ~/.ssh location in your local host.
If you have not done so, run the following commands if you downloaded the private key pair to your "Downloads" folder:
mv ~/Downloads/My_Key_Pair.pem ~/.ssh/My_Key_Pair.pem
chmod 600 ~/.ssh/My_Key_Pair.pem ##this creates the right permissions for the private keypair
Sometimes there may be folder ownership permissions preventing you from moving files into it. You can check the ownership of the ~/.ssh folder by doing:
ls -lh ~/.ssh If you don't see your computer username in the third column, this would be why. You can use sudo to move the file on your computer if necessary:
sudo mv tick.pem ~/.ssh/tick.pemIf you cannot move it to that folder, you will just need to ensure you save your SSH keys in a folder that you will not lose/forget, as you will need that for logging in to the instance
The login_name, which is the Linux OS image you chose:
Ubuntu ubuntu Rocky Linux rocky CentOS Stream ec2-user CentOS centos Fedora fedora Scientific Linux root Debian debian - The public external IP attached to your Nimbus instance, e.g.
###.###.##.##
SSH Login on the terminal
ssh -i ~/.ssh/My_Key_Pair.pem login_name@###.###.##.##
Log in via Visual Studio Code
Visual Studio Code is a free and open source code editing software that can be deployed on Linux, macOS and Windows. It has an integrated terminal within its user interface that removes the need to switch between command-line tasks and code editing. The default terminal shell is bash on Linux and macOS, and PowerShell on Windows. *For Windows users to configure the default terminal shell to bash, an installation of Git from https://git-scm.com/downloads is required before installation of Visual Studio Code.
You can download Visual Studio Code from the following link: https://code.visualstudio.com.
To log in to Nimbus, follow the instructions as per above.
Recommended settings in Visual Studio Code
Although the integrated terminal on visual studio code can be used directly to SSH log in to Pawsey systems, a useful feature of Visual Studio Code is the Remote Development extension pack that is easily installed from the Marketplace within the application. It allows the ability to open remote directories and text files on Visual Studio Code for in-app code editing and building.

Once installed, connect to Pawsey systems as follows:
- Click on the green button in the bottom left corner of the screen and select the first option Remote-SSH: Connect to Host...

- Select + Add New SSH Host...

- Log in using your Nimbus key pair and external IP address, e.g.
ssh -i ~/.ssh/My_Key_Pair.pem ubuntu@###.###.##.##(Note: if using a Windows path, e.g.C:\Users\Username\.ssh\My_Key_Pair.pem, you will need to use double slashes, i.e.C:\\Users\Username\\.ssh\\My_Key_Pair.pem)
- Save the host details in the default config file, e.g.
/Users/yourcomputername/.ssh/config
- Once the host details is saved, click Connect. A prompt appears for you to enter your Pawsey password.


- Review the new window with the integrated terminal that opens. In the bottom left corner, you can see that you are connected to the remote host.

Note: To use code editing interactively, use the command code to open and edit text files from your remote directories, e.g. typing the command code sample.txt will open the <sample.txt> file within Visual Studio Code.
To troubleshoot any issues, visit https://code.visualstudio.com/docs/remote/troubleshooting
Login via Windows with PuTTY
What you need
Your instance’s IP address -> get this from the instance overview in your dashboard ###.###.###.###
Your login_name -> this depends on the name of the Linux OS image you selected
Login names:
| Ubuntu | ubuntu |
| Debian | debian |
| Fedora/Centos/Scientific Linux | fedora/centos/root |
- The location and name of your private key pair, for eg "MyKeyPair.ppk". If you have not yet generated your Putty private key, follow these steps:
- Open PuTTYgen (All Apps -> Putty -> Puttygen)
- Click the LOAD button.
- Select the .pem file you downloaded from the Nimbus dashboard. If you cannot see your .pem file , select All Files instead of Putty Private Key Files from the drop-down bottom menu.
- Set a new passphrase and confirm it for your private key.
- Click the Save private key button and give it the name you prefer.
Steps to log in
- Open Putty.
- Under Host name (or IP address), type: login_name@###.###.###.###
- In the menu on the left, expand SSH and click on Auth.
- Under the section Authentication parameters, click on Browse....
- Select your previously create .ppk private key.
- Click on Open to start the connection to your instance.
Login via Windows with MobaXTerm
To install MobaXTerm:
- Go to the download for MobaXTerm Home Edition: http://mobaxterm.mobatek.net/download-home-edition.html.
- If you do not have Admin rights, select the Portable Edition.
- If you have Admin rights, select either the Installer Edition (or the Portable Edition).
Note: The Portable version is an executable file that you choose where to save it and launch it. For example, you can save it to a folder on your computer, on a USB drive or any other media. The Installer version puts MobaXTerm into a specific folder (usually Program Files), creates shortcuts to it, and includes an uninstaller.
IMPORTANT: If you receive an error on the MobaXTerm download, click the arrow and click Resume. The file is large and download times may vary/timeout.
- Select the version to install.
- Extract the zipped file.
- Go to the extracted file (exe file) and double-click it. This action launches the MobaXTerm window.

- To set preferences for your MobaXTerm session:
- Click Settings in the top tool bar.
- From the drop-down menu, select Configuration. The MobaXTerm Configuration window displays.
- On the General tab, confirm all defaults remain as illustrated here:

- To set SSH setting, click the SSH tab:
- In the SSH-browser setting section, unclick the Enable graphical SSH-browser checkbox. You uncheck (turn this off) so you do not create unnecessary connections to the remote host.
- In the SSH settings section, confirm X11-Forwarding is enabled (checked).

- Click OK to save the changes. The MobaXTerm home page displays
To launch a MobaXTerm session:
On the MobaXTerm home page, click the Start local terminal button or click Enter. A new tab displays with the MobaXTerm window ready for use.

Login via Windows with Windows Terminal / PowerShell / cmd
To install Windows Terminal:
- Windows PowerShell, Command Prompt, and Terminal offer similar functionality and all can be used to SSH into your Nimbus instance. Windows Terminal is the newest application and is an open-source project that supports Bash (Bourne Again Shell). It now comes standard with Windows 11 but can be installed via Microsoft Store : https://apps.microsoft.com/store/detail/windows-terminal/9N0DX20HK701
- Change permissions of the .pem file you downloaded (from https://pawseysc.github.io/using-nimbus/05-access-and-use-instance/index.html)
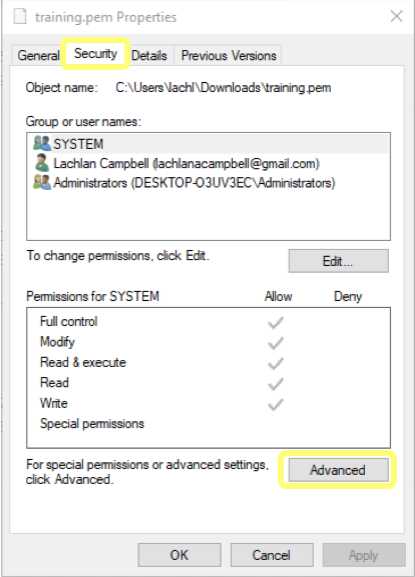
On Windows, SSH will work regardless of whether the key file is only readable by you. To modify the key’s permissions, locate it in Windows Explorer, right-click on it then select Properties. Navigate to the Security tab and click Advanced.
Disable inheritance and remove all permissions.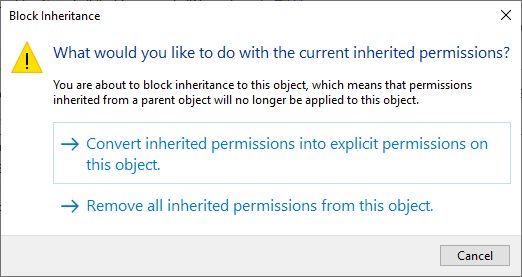
Then add a new permissions entry.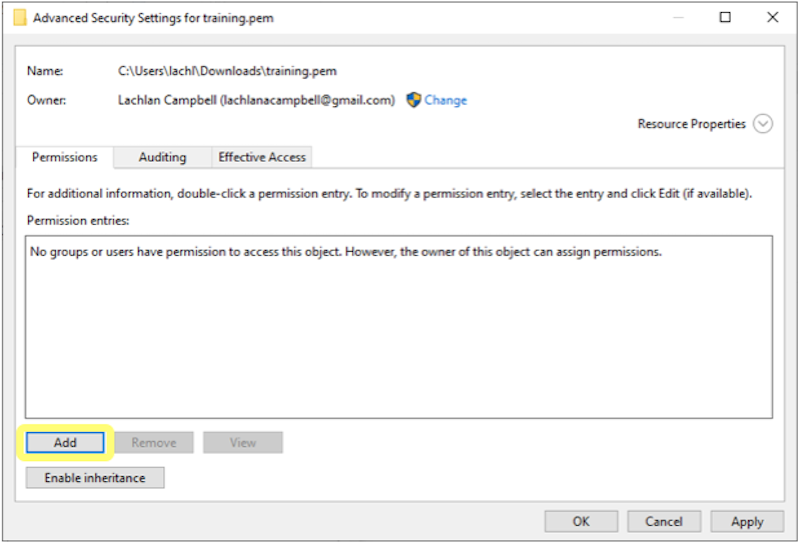
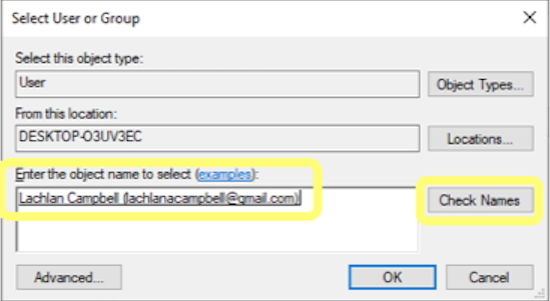
Click Select a principal and enter your user name. The easiest way to do this seems to be to enter the email address associated with your Microsoft account (the one listed under your profile information on the computer you are using), and then press Check Names. Otherwise, you can select the advanced option and it reveals a more comprehensive search engine for you to use.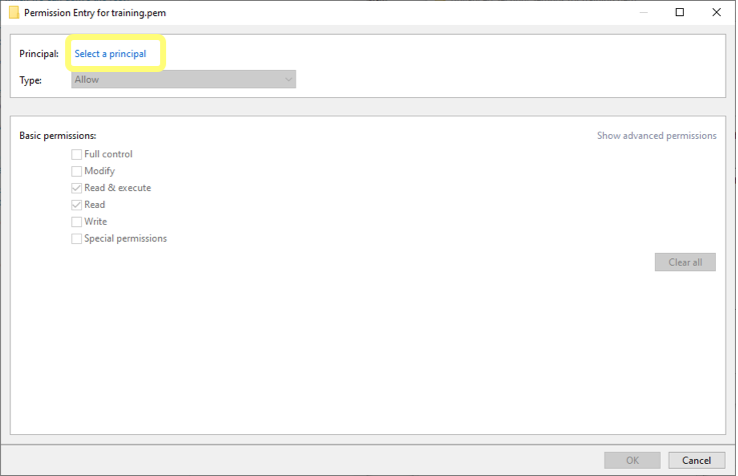
Clear all permissions then grant yourself Full Control and apply the changes.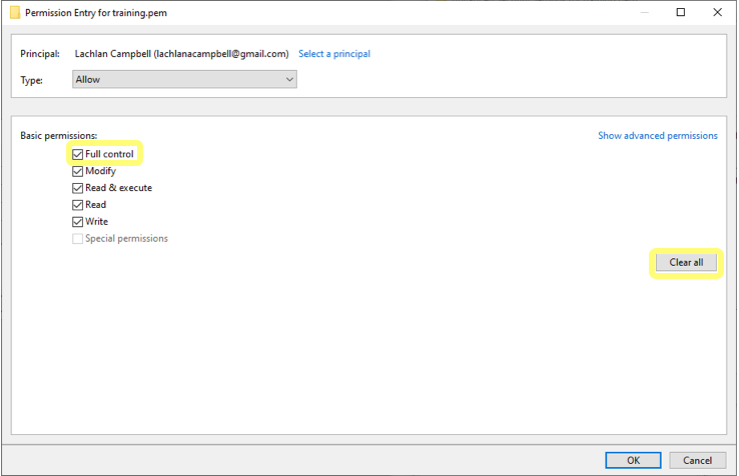
Your key file should now have security settings that look like those shown below.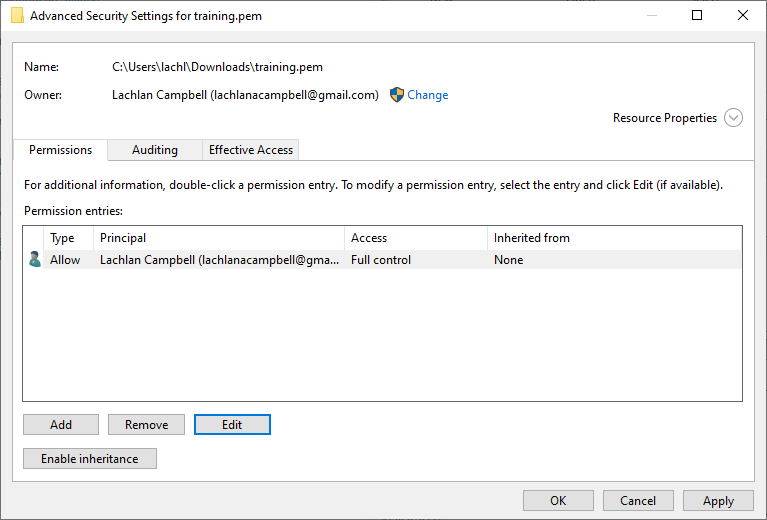
SSH via Terminal / PowerShell / cmd:
- Open up your preferred command-line client and enter the following (if in the folder of the downloaded .pem file)
ssh -i 'name_of_your_key'.pem 'login_name'@###.###.###.###
For further details visit https://pawseysc.github.io/using-nimbus/05-access-and-use-instance/index.html

